

I have always been fascinated by rope work, one of the first things that caught my eye was the pure artistry of the ties and what could be done with them.
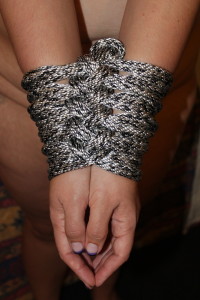
Above is some of my handy work putting little flower in a two-column weave or as some will call it a cuff tie.
Really it is less of a tie then what the name implies a weave. A very simple one at that but effective for arms, legs, tying arms/legs to each other, or even to a bed or chair.
Here is a simple tutorial on how to create this visually aesthetic and functional weave.
For the tie I did on little flower I used a 30′ length of rope, you can go longer depending on how big you want the weave to be.
Please note that this is not a good tie for any weight bearing or suspension. Also before attempting to any type of rope tie be sure to have safety equipment close at hand. A pair of safety scissors are around $4 at your local pharmacy and if you need to cut the rope quickly it will do so without harming your rope bunny.
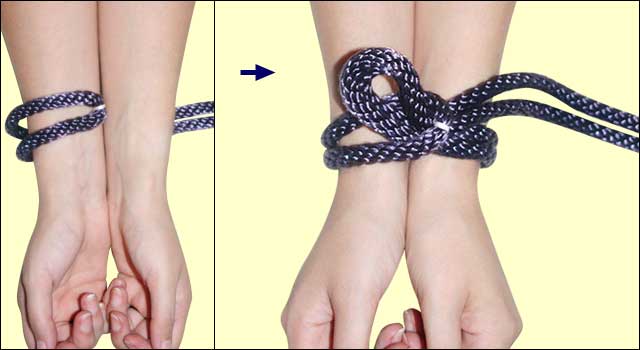
This two-column tie starts, as most ties do, by finding the middle of the rope. As you can see, I tend to tie a small piece of thread around the middle of my rope, to make it easier to find.
For the purposes of this tutorial, I’m going to show you how to tie your partner’s arms together with a no-knot two-column weave. You can do the same thing with your partner’s legs, or an arm and a leg, or whatever.
Fold the rope at the middle. Lay the rope beneath your partner’s arms near the wrists. Place the loop on top of your partner’s arms as is shown below.
The concept of a “loop” is important here, and one we’ll keep coming back to. Essentially, you are going to push the rope through the loop to make a second loop, then bring the rope back underneath your partner’s arms, then push the rope through the second loop to make a third loop….but I’m getting ahead of myself.
So. Put the middle of the rope over your partner’s wrists. Now take the rope and push it through the middle to create a loop like you see in the right-hand side here. Describing it is much more complicated than actually doing it, I promise; when you get going, it’s easy.
Don’t pull the rope tight. Instead, just hold on to the loop and bring the rope back around under your partner’s wrists again. Then push the rope through the first loop you made, to make a second loop. Again, it’s a whole lot simpler than it looks; this is one of those things that when you try it, you’ll find it’s really easy.
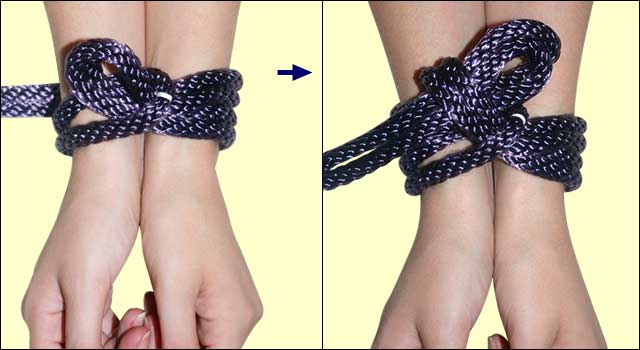
You’re just going to keep doing this over and over. Bring the rope around your partner’s wrists, push it through the loop to create another loop, bring it back around, push it through the loop to create another loop, over and over. The only trick is to make sure that you don’t twist the rope; make sure it lays flat against your partner’s skin. Don’t make it too tight; you should be able to stick a finger under the rope. You don’t want to cut off circulation!
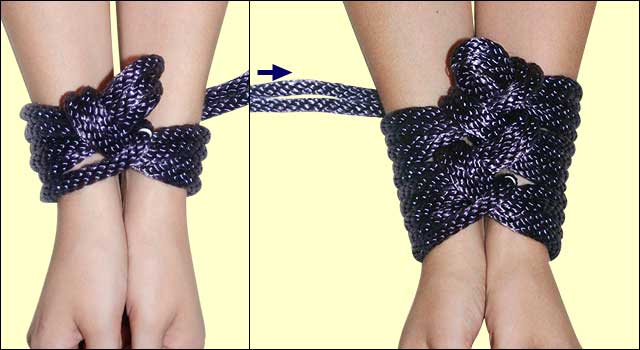
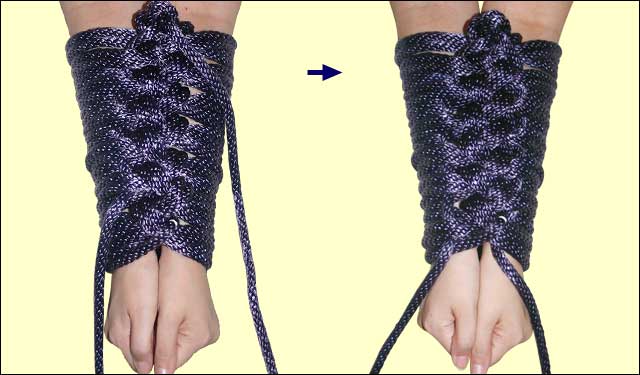
And that’s it. Just keep repeating this all the way up.
When you get to the top of whatever you’re tying together, there are a few ways you can finish. The simplest thing is just make a knot at the last loop. Or, if you have a lot of rope left over, just take the two ends of the leftover rope and run them down the inside of the weave. If you want to get even fancier, take the two ends of leftover rope and go over the first turn of rope around your partner’s wrists, under the second, over the third, under the forth, and so on.
Tutorial and photo’s are courtesy of tacit